
At the moment, there are two most popular methods by which you can root an Android device. One is by using Chainfire’s SuperSU, which we have used and loved over the years. And the second method is by flashing topjohnwu‘s Magisk.
SuperSU has enjoyed a monopoly in the world of Android rooting for a significant time period until Magisk made its debut. Magisk has quickly become one of the most preferred choices among those who are looking to root their Android device. There are a great many advantages of rooting Android with Magisk and we shall discuss the same in a short while. One of the most important among them is that Magisk also offers several other functionalities such as hiding root from apps that will not work on rooted Android devices.
In this article, we are bringing you the latest version of Magisk Zip file along with the latest version of Magisk manager. Note that this article will always be updated with the latest version of Magisk Zip and Magisk Manager. For your convenience, we have also included easy guides by which you can easily root your Android device using Magisk.
What is Magisk?
Magisk is a popular Android rooting solution which comes in the form of ZIP file which is used to root Android devices. It is developed by the developer topjohnwu in 2016 as an alternative way to root Android devices other than the famous SuperSU by Chainfire.
The Magisk comes in the form of a zip file which can be flashed via custom recovery such as TWRP in order to achieve root on Android devices. Once you have flashed the Magisk Zip file via TWRP, you can handle the front end activities, including but not limited to manager root access, via an App called Magisk Manager.
Further reading on this topic: What is Magisk | Everything you need to know
Features of Magisk
Below are some of the really interesting features of Magisk:
- You can easily carry out system/vendor partition modification on your Android device without actually tampering them. That’s right, with Magisk, you are keeping the system partitions intact. This is the reason why Magisk is called as systemless root. Magisk only modifies the boot image and installs necessary files to the /data and /cache partitions without making any changes to the /system partition.
- Magisk is Open Source. This may not sound like a big deal but it actually is. Unlike SuperSU, which is proprietary to chainfire, Magisk is open source and it’s source codes are available for anyone to develop further or add functionalities.
- Magisk comes with Magisk Manager which is a front-end helper app which is really easy to use. It helps you manage root privileges (grant/revoke) and also manage the Magisk Modules (we will come to that in a bit).
- You can easily install official stock ROM OTA updates if you are rooted with Magisk.
- Some apps and games do not work on rooted Android devices. This is because rooted Android devices trigger Google’s SafetyNet Security Check. When an Android device is rooted with Magisk, there is an option that helps the users to hide the rooting functionality from Google’s SafetyNet Security check. More control to you!
- Comes with a nifty little utility called as Resetprop which allows you to make any modifications to system properties, including read-only props.
How to Install Magisk and Root Android Device?
There are two folds to how Magisk works.
- Magisk Zip – TWRP Flashable
- Magisk Manager APK – Installable as normal APK file
The Magisk rooting solution comes in the form of zip file which has to be installed via a custom Android recovery such as TWRP. Once we have flashed Magisk via TWRP Recovery, then we can proceed with the rest of the setup to start using Magisk.
Below are the steps to be followed to successfully install Magisk on your Android device:
- Unlock Bootloader
- Install TWRP Recovery
- Flash Magisk Zip file
- Install and Setup Magisk Manager
We shall see each one of them in detail below.
1. Unlock Bootloader of your Android device
Before unlocking the bootloader of your device, please note that this procedure will completely wipe out all the data on your device. So, please take a full backup of your Android device before proceeding.
There are some prerequisites that have to be met before you can proceed to unlock bootloader of your Android device. They are:
- Download ADB and Fastboot Drivers.
- Install Google USB Drivers.
- Enable Developer Options.
- Open Settings.
- Tap on About phone.
- Tap on Build Number continuously till you see a toast message similar to ‘You are now a developer’.
Note: In some devices such as Huawei, MIUI or Samsung, the Build number option may not be found in the above-mentioned place. Simply do a search in the settings to find it out.
- Enable OEM unlocking option.
- Go to Settings.
- Tap on Developer options.
- Tap on OEM Unlock option and enable the same.
Once the above requirements are met, follow the below guide to unlock bootloader on your device:
Note: This is a generic guide which will work on devices running Stock Android or close to Stock Android. For other devices, check the process accordingly.
- Connect your device to your PC via USB cable.
- Go to the folder where ADB and Fastboot are installed on your PC. Open a command prompt from inside the folder. To do this: Hold down Shift + Right Click > Select ‘Open command window here’ or ‘Open PowerShell window here’.
- On your computer, execute the following command on your command prompt:
adb devices
If this is your first time connecting your device to your PC with USB Debugging enabled, you will be prompted with ‘Allow USB Debugging?’. Tap on ‘Always allow from this computer’ and tap on OK.
- Now execute the below command to reboot your device into bootloader mode:
adb reboot bootloader
- Once your device is in bootloader mode, execute the following command in command prompt:
fastboot oem unlock
[Not applicable to all devices] You might get confirmation screen on your device. If you do, use the volume buttons to select Yes and press the Power button to confirm the selection.
- Once the bootloader unlock process completes, your device will again reboot into bootloader mode. Execute the following command to reboot your device:
fastboot reboot
Now your device will reboot into Android OS.
2. Install TWRP Recovery on your Android Device
- Head over to the official TWRP devices portal and download the TWRP Recovery image file for your device: Official TWRP Device Portal
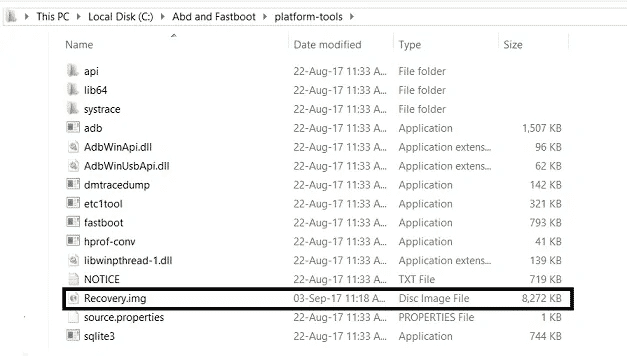
- Download the TWRP Recovery .img file for your device from the link above. Rename that file to recovery.img.
- Now place the recovery.img file in the ADB and Fastboot folder.(On my PC the path is C:\Abd and Fastboot so I pasted it here).
- Connect your device to PC via USB cable.
- Open a command prompt window here by holding Shift key + Right Click > Select Open Command Window here.
- Once the Command window is opened, type the following command to boot your device into Bootloader.
adb reboot bootloader
- Once your device is in Bootloader mode, install the recovery.img file by typing the command as follows
fastboot flash recovery recovery.img
- Now simply Reboot your device by typing the command as
fastboot reboot
Congratulations! You have successfully installed TWRP Recovery on your Android device. You shall now proceed with the next step.
3. Flash Magisk Zip file via TWRP
- Download latest Magisk zip file from the download link in the download section above.
- Transfer the downloaded Magisk Zip file to your phone’s internal memory.
- If your device is connected to your PC, disconnect the same.
- Reboot your device into TWRP Recovery.
- Once you are in TWRP Recovery: Tap on ‘Install‘ and select the downloaded latest Magisk Zip File and ‘Swipe to confirm flash‘ to install Magisk on your Android device.
- Once the above process completes, reboot your device.
4. Install and Setup Magisk Manager
- Download the latest Magisk Manager APK file from the download section above.
- Copy the downloaded APK file to your phone.
- Make sure Unknown Sources is enabled on your Android device.
- Open a file manager of your choice and navigate to the folder where you have copied the Magisk Manager APK file.
- Tap on the file and install it as normal APK.
- Done.
Once it is installed, you are good to go. Simply open the Magisk Manager app and check if everything is all right. This step completes the whole Magisk setup on your device!
Conclusion
Magisk might be a relatively new player in the market but it is no way inferior to the popular rooting solution SuperSU. Apart from offering a way to root your Android device, Magisk also comes with a host of features which truly add value to the whole experience. If you have so bar been contemplating on which rooting method to use, Magisk or SuperSU, do give Magisk a shot and you will not regret it!
I have been using this as my go-to rooting solution for the past year or so and there have been no issues, at all. Magisk is constantly under development and updates are pushed out much faster. Also, Magisk is quick to add support to new devices as well. With Google changing so much about how Android works internally, making a perfect rooting solution is becoming hard every day. But with Magisk, you can rest assured that your device will always stay rooted, no matter how many new Android versions come up. As we already said before, Magisk is Open Source, just like Android and it is here to stay.